
Keeping business and personal financials separate is essential for any freelancer or small business owner. The first step should always be to open a business checking account and credit card, and use these accounts exclusively for business purposes. Then you have to keep track of all the transactions.
The usual advice is to keep two separate QuickBooks company files--one for business and one for personal finances. While ideal from an accounting perspective, this method isn't the most practical solution for a busy professional. Keeping two sets of books means more work whenever you have transactions involving both the business and the personal entity. And because you have to look at two different files to see where your money is going, it makes it even more difficult to stay in control of your finances.
Ideally, you want to be able to keep your finances separate while also being able to see the whole picture in a single report. Fortunately, there are a few tricks that let us achieve this in QuickBooks using a single company file.
Make use of "Other" income and expense accounts
The method I have found that takes the least extra work is to modify the chart of accounts so that you are making use of the "other" income/expense account types for your personal income/expense. "Other" accounts are just like normal accounts, except they display in a separate section below the normal (operating) income/expense accounts on the Profit & Loss report. Most people never use them, and if that's the case for you, then we can repurpose them to create an all-in-one Profit & Loss report showing both business and personal expenses in separate sections.
To set up your reports this way, first create your business income/expense accounts normally in QuickBooks. Then add your personal income/expense accounts, but when it comes time to choose the account type, select "Other Income" for the income accounts and "Other Expense" for expense accounts. These account types are normally hidden, so you may have to hunt for them. In QuickBooks Online, for example, you have to select the option to "Choose from all account types" before you can select Other Income or Other Expense. You can also freely switch existing accounts between Income and Other Income, or Expense and Other Expense.
Avoid confusion between similar accounts
When adding personal accounts, you may need to create accounts with the same name as already-existing business accounts. To avoid confusion, make sure to prominently identify each of the similar accounts with "business" or "personal" in the title. For example, if you have both business rent and personal rent expenses, make one account "Business Rent" and the other "Personal Rent".
Enjoy seeing all income/expense in one place
After setting up your chart of accounts, open the Profit & Loss report. You'll see your business income and expense accounts at the top in the "Operating" section. Net business income is called "Net Operating Income". Your personal income/expense accounts will appear below in the "Other Income and Expenses" section. The net for personal income and expense is called "Net Other Income". The bottom line ("Net Income") represents net income for business and personal combined.
How to show transfers between business and personal accounts on the P&L
There's one small downside to this method, which is that transfers between your business and personal accounts won't show up on the Profit & Loss report by default. Consider the situation where you pay yourself a monthly "salary" by transferring $10k from your business checking to your personal checking. If you're using two company files, this transaction is an expense on the business side and income on the personal side. But if you are using a single company file, the transaction is just a transfer between bank accounts, so it won't show up unless we make a small change to the usual transaction. Here's how to get the salary to show up using QuickBooks Online. The process is identical in the desktop version.
Create two accounts if you don't have them already. The first is "Guaranteed Distributions", which we'll use to keep track of the salary you pay yourself as the business owner. For the account type, use a normal expense account so that it will show up in the business section of the P&L. The second account you need is called "Salary Income". It should be an Other Income account so that it shows up in the personal section of the P&L.
Next, open the write check dialog.
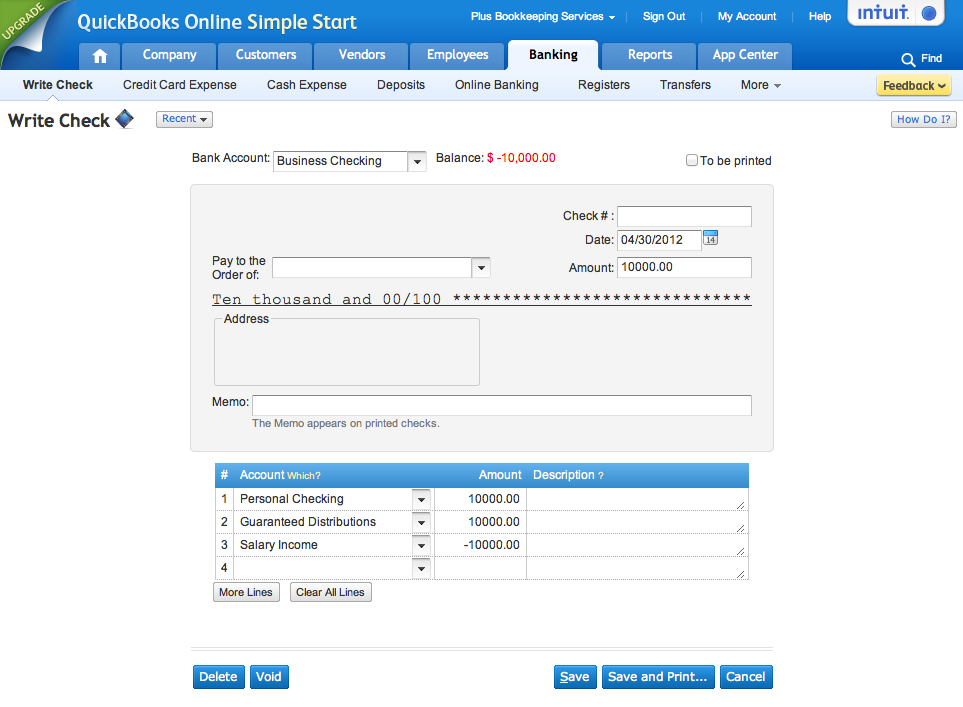
Select your business account from which you will pay the salary. Enter the amount of the check ($10,000 in our example). Then, in the area where you can itemize the check, use the following three lines, changing the accounts as appropriate if you use different names:
- Personal Checking: 10,000
- Guaranteed Distributions: 10,000
- Salary Income: -10,000 (Don't forget the minus sign or the transaction won't balance. The amount is negative, but it will still increase the Salary Income account.)
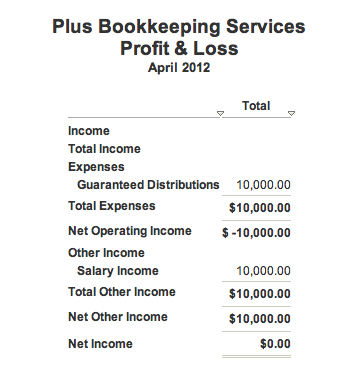
Now when you view the P&L you'll see an expense in the business section and corresponding income in the personal section. Remember, this is a completely optional step. If you don't need or want to record the amounts you pay yourself, you can always do a regular transfer.
